 English
 简体中文
简体中文 Chinese
 English


Tongxiang Qianglong Machinery Co., Ltd. is high-tech China wholesale computerized flat knitting machine manufacturers, specialized in designing, developing, and manufacturing Knitting Machinery..
Content
- 1 Why Flat Knitting Machines Are Used for 3D Shoe Upper Production
- 2 Understanding the Machine Specifications Required for Shoe Uppers
- 3 Yarn Selection for Different Zones of the Shoe Upper
- 4 Programming the 3D Structure: Shaping and Zoning Techniques
- 5 Machine Setup and Tension Calibration for Upper Knitting
- 6 Post-Knitting Processes That Complete the 3D Upper
- 7 Common Defects in 3D Knitted Uppers and How to Prevent Them
Why Flat Knitting Machines Are Used for 3D Shoe Upper Production
The shift from cut-and-sew construction to fully knitted shoe uppers has fundamentally changed how performance and casual footwear is engineered and manufactured. At the center of this shift is the computerized flat knitting machine—a technology that has evolved far beyond its origins in garment production to become the dominant platform for manufacturing 3D shoe uppers at commercial scale. Unlike circular knitting machines, which produce tubular fabric suited for socks and seamless garments, flat knitting machines operate on two opposing needle beds arranged in a V-shape, giving them the ability to work in multiple directions, transfer stitches between beds, and shape fabric three-dimensionally without cutting. This capability makes them uniquely suited to producing shoe uppers as single-piece knitted structures that conform to the complex geometry of a foot without seams at structurally critical locations.
The practical advantages over conventional upper construction are significant: material waste is reduced to less than 5% compared to 30–40% in cut-and-sew methods, labor requirements are dramatically lower since no stitching assembly is needed, and the knitted structure allows zone-specific performance engineering—placing breathable open meshes at the forefoot, supportive dense knit at the midfoot, and cushioning terry structures at the heel within a single continuous fabric. Understanding how to configure and operate a flat knitting machine specifically for 3D shoe upper production is a technical discipline that combines machine programming, yarn science, and footwear engineering.
Understanding the Machine Specifications Required for Shoe Uppers
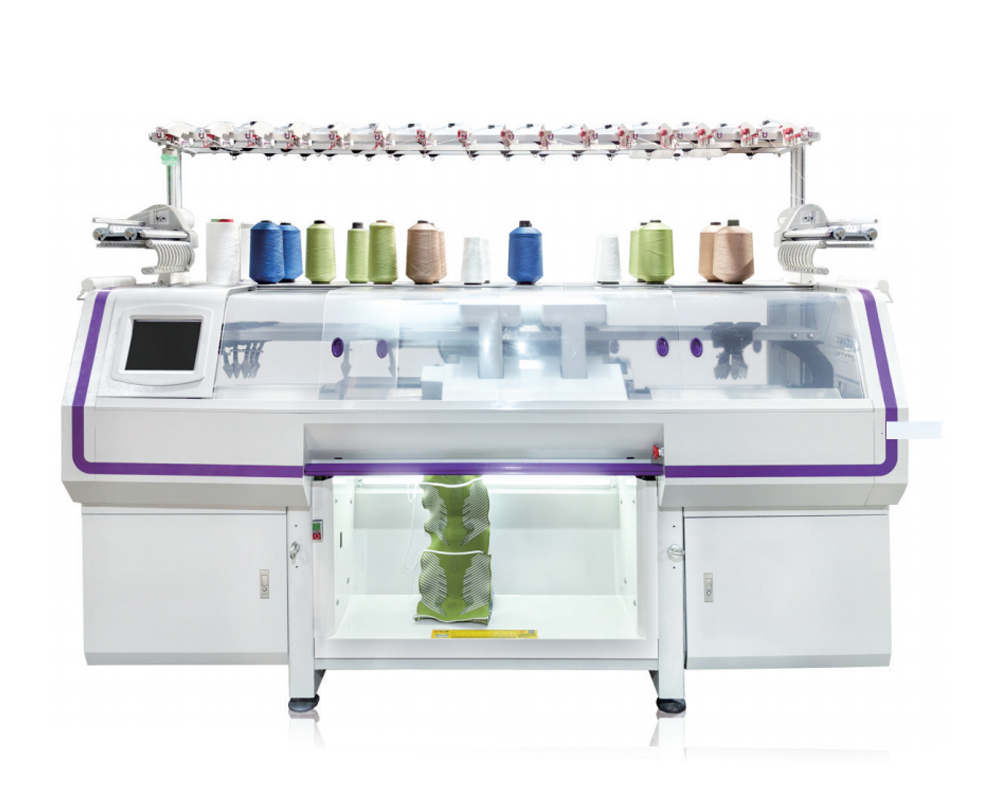
Not every flat knitting machine is capable of producing a proper 3D shoe upper. Several machine specifications are critical prerequisites before attempting upper production, and selecting the right machine configuration is the first decision a manufacturer must make.
Gauge—the number of needles per inch on each needle bed—is the most fundamental specification. For shoe uppers, gauges between 12 and 15 are the most common, with 15-gauge machines producing finer, smoother fabric suited for lifestyle and fashion footwear, and 12-gauge machines better suited to athletic uppers where yarn count and fabric weight are higher. Finer gauges such as 18 produce hosiery-weight fabrics that are too delicate for most shoe upper applications without significant reinforcement yarns. The machine must also have at least two yarn carriers capable of operating simultaneously to enable intarsia-style color and structure zoning without cutting and rejoining yarn between sections.
Machines intended for 3D shoe uppers must support compound needle technology or latch needle beds with reliable stitch transfer capability. Compound needles allow finer stitch control and faster operation, while the transfer function is essential for creating the three-dimensional shaping that distinguishes a knitted upper from flat fabric. Leading machine manufacturers including Shima Seiki, Stoll, and Lonati offer dedicated shoe upper knitting systems with specialized sinker geometries and take-down mechanisms designed to handle the concentrated mass of a shoe upper as it builds up on the needle bed during knitting.
Yarn Selection for Different Zones of the Shoe Upper
The performance characteristics of a 3D knitted shoe upper are determined as much by yarn selection as by machine programming. Different zones of the upper have different functional requirements, and modern flat knitting machines can switch between yarn carriers mid-course to introduce zone-specific yarns within a single piece. Understanding the properties of available yarns and how they map to upper zones is essential knowledge for any technician working on shoe upper production.
- Monofilament and multifilament polyester: Fine polyester multifilament yarns (typically 75D to 150D) form the structural backbone of most knitted uppers. They provide dimensional stability, abrasion resistance, and consistent stitch geometry. Monofilament yarns in finer counts are used where a stiff, open mesh structure is required, such as vamp areas where airflow is prioritized.
- Thermoplastic yarns (hot melt): TPU or low-melt polyester yarns are knitted into zones that require structural reinforcement—the heel counter, eyelet rows, and collar edge. When the completed upper is passed through a heat tunnel after knitting, these yarns fuse with adjacent yarns, creating stiff, bonded zones that replace traditional reinforcement components without added adhesive or material layers.
- Elastomeric yarns (spandex/Lycra): Elastic yarns are incorporated into the ankle collar and instep areas to provide stretch and recovery that secures the foot within the shoe without the need for a separate elastic component. These yarns are typically inlaid (laid in between stitch loops rather than formed into loops themselves) to maximize elastic recovery.
- Recycled PET and specialty fibers: Sustainability requirements from major footwear brands have driven adoption of rPET yarns made from post-consumer plastic bottles. These perform comparably to virgin polyester in knitting but require tighter tension calibration due to slightly higher yarn coefficient of friction. Specialty fibers such as Dyneema or Vectran are used as inlay reinforcement in performance models where tear resistance is critical.
Programming the 3D Structure: Shaping and Zoning Techniques
The defining capability of a flat knitting machine in shoe upper production is its ability to produce three-dimensional structure through programmed shaping—using needle activation patterns, stitch transfer, and partial knitting to build a fabric that conforms to the geometry of a foot last without cutting or sewing. Programming this structure requires dedicated CAD software. Shima Seiki's SDS-ONE APEX system and Stoll's M1 Plus are the two most widely used platforms, both of which include shoe upper-specific design modules that simulate the knitted structure in 3D before any physical sample is produced.
Partial Knitting for Three-Dimensional Shaping
Partial knitting—also called short-row knitting—is the primary technique for building three-dimensional geometry into a flat-knitted upper. By activating only a subset of needles on one or both beds during selected courses, the machine builds additional rows of fabric in localized areas while the surrounding needles hold their loops. This creates controlled curvature: the area receiving additional rows becomes longer relative to adjacent areas, causing the fabric to curve or cup. In shoe upper programming, partial knitting is used to build the heel cup depth, the toe box volume, and the instep curvature that allows the flat-knitted piece to fit over a foot last without pulling or distorting at critical geometry changes.
Stitch Transfer for Structure and Texture Variation
Stitch transfer between the front and back needle beds is used to create structural effects that serve both aesthetic and functional purposes. Transferring stitches from the front bed to the back and re-knitting them produces a tuck or cable effect that increases local fabric thickness and stiffness—useful for creating integrated toe caps or midfoot support structures without adding separate components. Transferring stitches outward along the bed (widening) or inward (narrowing) achieves the shaped silhouette of the upper, controlling the width of the ankle opening, the throat width at the lacing zone, and the toe shape according to the last dimensions programmed into the CAD system.
Intarsia and Jacquard Programming for Zone Differentiation
Intarsia knitting allows different yarn carriers to work in isolated zones within the same course without carrying the yarn across the full needle bed. This technique is critical for shoe uppers where adjacent zones require entirely different yarns—for example, a breathable monofilament mesh zone directly alongside a solid polyester jacquard zone. Jacquard programming on double-bed machines allows up to four yarn colors or types to be incorporated within a single course across the full width, enabling complex graphic patterns, multi-material structures, and integrated branding elements to be produced entirely in the knitting process without any post-production printing or embroidery.
Machine Setup and Tension Calibration for Upper Knitting
Setting up a flat knitting machine for shoe upper production requires careful calibration of several interdependent parameters. Tension—the force with which the fabric is pulled downward from the needle bed during knitting—is the most sensitive variable and must be adjusted dynamically as the upper builds up in mass. At the start of the upper, when only a few courses have been knitted, very low take-down tension is required to prevent the initial courses from being pulled off the needles. As the fabric grows, tension is progressively increased to maintain consistent stitch geometry. Machines equipped with servo-controlled take-down systems handle this automatically based on programmed tension curves, while older pneumatic take-down systems require manual adjustment between sections.
Stitch cam settings—which control how far the needles descend to draw loops of yarn—must be calibrated separately for each yarn zone because different yarns have different stiffness and friction properties. A thermoplastic yarn requires a slightly deeper stitch cam setting than a standard polyester at the same count because its higher surface friction resists drawing through the needle hook. Running the same cam setting for both yarns in a multi-yarn upper produces inconsistent loop lengths that manifest as visible texture irregularities and dimensional variation in the finished piece. Technicians typically produce a calibration swatch for each yarn in the program before knitting the first full upper, measuring stitch length against specification before approving machine settings for production.
Post-Knitting Processes That Complete the 3D Upper
The upper as it comes off the knitting machine is not yet ready for lasting and assembly. Several post-knitting processes transform the raw knitted piece into a dimensionally stable upper capable of withstanding the lasting operation and the mechanical demands of shoe assembly.
| Process | Purpose | Key Parameters |
| Heat Activation | Fuses thermoplastic yarns to bond reinforcement zones | 130–160°C, 60–90 sec dwell time |
| Last Forming | Shapes the upper over a heat last to set 3D geometry | Steam or dry heat, last specific to size |
| Edge Sealing | Prevents unraveling at collar, vamp, and toe edges | Hot melt tape or ultrasonic bonding |
| Lamination (optional) | Bonds foam or film lining to interior surface | PU foam 1–3mm, flame or adhesive bond |
| Quality Inspection | Checks dimensions, zone placement, yarn defects | Against technical specification per size run |
Heat activation is particularly critical when thermoplastic reinforcement yarns are used. The upper must be placed flat or on a perforated mold in the heat tunnel to ensure even temperature distribution across all zones. Uneven heating produces partially fused areas that feel inconsistent to the wearer and may delaminate under flexion stress during use. After heat activation, the upper is placed on a sizing last and steam- or heat-formed to the target three-dimensional shape. This step sets the heel cup depth, toe spring, and collar opening geometry that allow the upper to be lasted efficiently on the assembly line without deformation.
Common Defects in 3D Knitted Uppers and How to Prevent Them
Even with well-calibrated machines and correctly programmed designs, 3D knitted shoe uppers are susceptible to a set of recurring defects that technicians must be trained to identify, diagnose, and correct at the machine level before they propagate through a production run.
- Dropped stitches: Caused by insufficient yarn tension, a damaged needle hook, or incorrect stitch cam depth. Dropped stitches create visible holes in the fabric and structural weak points. Corrective action involves inspecting needles in the affected zone and recalibrating cam settings for that yarn carrier.
- Dimensional inconsistency between sizes: Arises when the CAD grading is not proportionally correct or when stitch density varies between needle bed zones due to tension drift. Each size in a run must be dimensionally verified against the approved last before full production proceeds.
- Yarn carrier collision: Occurs when two carriers are programmed to occupy the same bed position simultaneously in an intarsia program. This causes machine stops and potential needle damage. Carrier path sequencing must be verified in simulation before the program is sent to the machine.
- Uneven heat activation zones: Result from non-uniform temperature distribution in the heat tunnel or inconsistent upper positioning on the conveyor. Regular calibration of tunnel temperature profiles and standardized upper placement fixtures prevent this defect from affecting bonded structural zones.
